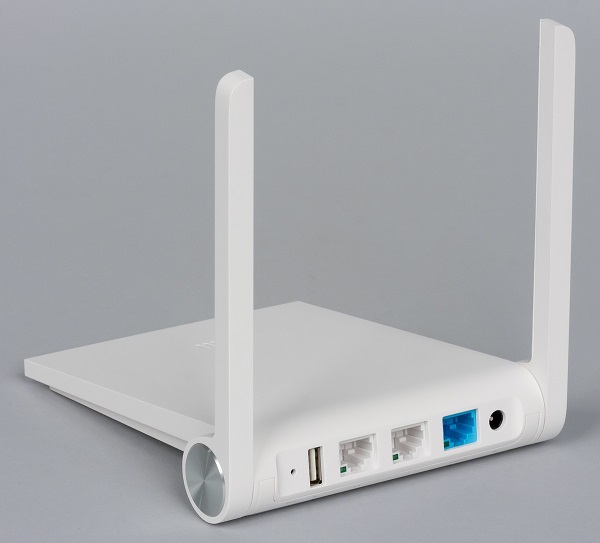
Before starting, make sure that the firmware you are using is version miwifi_r1cm_firmware_b9d56_2.7.11.bin (develop firmware). If it is not the correct version, please flash it again using the download link below
https://files1.airplaycar.com/api/public/dl/aNhlnMar
Part 1 — Gain access to the router console (either telnet, ssh or web based console)
There are various ways to gain access to the console ( https://wiki.openwrt.org/toh/xiaomi/mini ), this is the easiest.
1. Connect to your PC to your router with the ethernet cable;
2. power on and setup the Xiaomi router until it reboots and gets IP address 192.168.31.1;
3. log-in into the router and grab the value of the stok URL parameter (for instance: “147211e3f821c60ed1d9e5048f5739f8”);
4. replace the placeholder and load this URL in your browser or curl, this will start telnetd on the router:
5. it should spit out some wifi error code {"msg":"未能连接到指定WiFi(Probe timeout)","code":1616}, that is ok, don’t worry;
6. replace the placeholder, the current password and the desired root password and load this URL in your browser or curl, this will set the router root password
it should spit out: {“code”:0} ;
Part 2 — Installing the custom bootloader — Breed
Warning/Disclaimer: there is a risk of damaging your device internal configuration if something goes wrong during the process. Proceed with absolute care if you don’t know what you’re doing. I deny any responsibility for any kind of damage caused to your router or to you.
1. Now I assume that you have access to your router console/telnet, so log in to the router firing up your linux console (or putty on windows)
telnet 192.168.31.1
2. this is the risky part, proceed with extreme caution as a broken bootloader could brick your router, the only way for you to revive the router would be to physically wire a serial cable to rewrite the bootloader;
4. download Breed for Xiaomi router mini here;
5. copy it to the root directory of a usb thumb drive (1GB free space is more than enough) with FAT/FAT32 partition;
6. plug the thumb drive into the router;
7. on the console connected via SSH to the router, type
cd /extdisks/sda1/
followed by
ls -l
you should be able to see the breed-mt7620-xiaomi-mini.bin file;
8. type
cat /proc/mtd
it will list out the partitions on the router flash chip;
9. look for “Bootloader”, it should be listed as mtd1: 00030000 00010000 “Bootloader”;
10. now dump a backup of the partition to your usb drive with the following command
dd if=/dev/mtd1 of=/extdisks/sda1/Bootloader.bin
11. you should also create a backup for all the other partitions listed by
cat /proc/mtd
you will see a list of blocks with a block index (e.g. mtd1) and the block’s name (e.g. Bootloader). Adjust the command above replacing the highlighted parts with their respective block index and name.
dd if=/dev/mtd1 of=/extdisks/sda1/Bootloader.bin
All of the backup files will be in the usb drive;
12. now you’re ready to install the custom bootloader, type
mtd -r write breed-mt7620-xiaomi-mini.bin Bootloader
13. it should show rebooting when the installation is complete.
Part 3 — Boot into Breed, install the QBox receiver v2.x (Padavan firmware)
1. download the firmware from airplaycar download page here, you will get QBOX-MI-MINI_3.4.3.9-099.trx file after extraction;
2. power off your router, look for a pinhole on the back, power on your router while pressing and holding the button inside the pinhole;
3. release the pinhole button when you see the orange/yellow light blinking;
4. open your browser (preferably Chrome) and type 192.168.1.1 into the address bar;
7. you should be able to access the Breed web interface (in chinese but I will guide you!);
8. now select the second button on the menu;
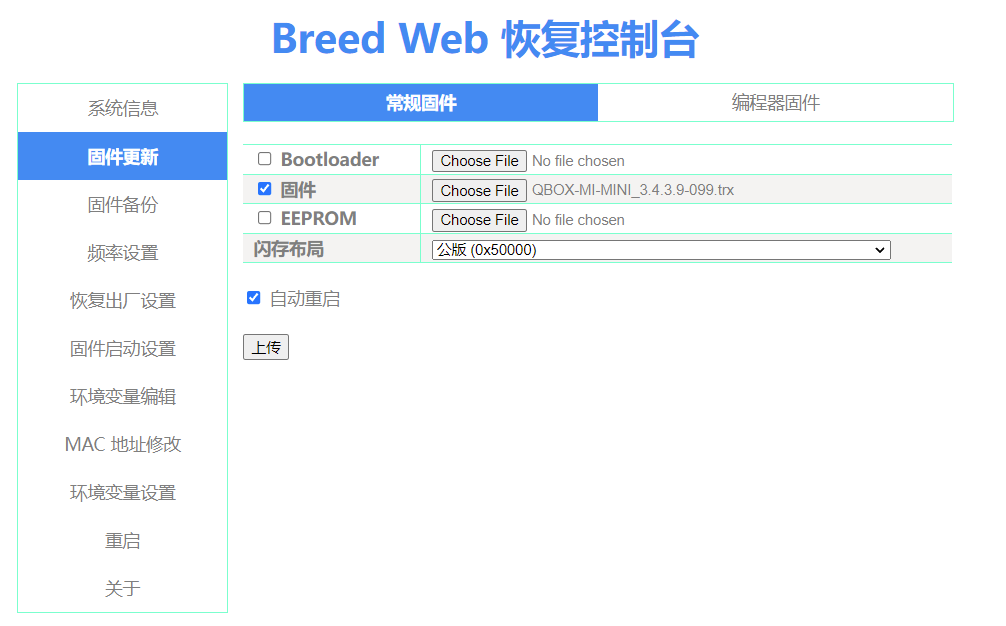
9. now you should be located at http://192.168.1.1/upgrade.html, select the custom QBOX-MI-MINI_3.4.3.9-099.trx firmware file on the second row of the form. Then press the last button on the bottom of the form. It should look like this 
10. wait for the progress bar to complete, it should reboot automatically;
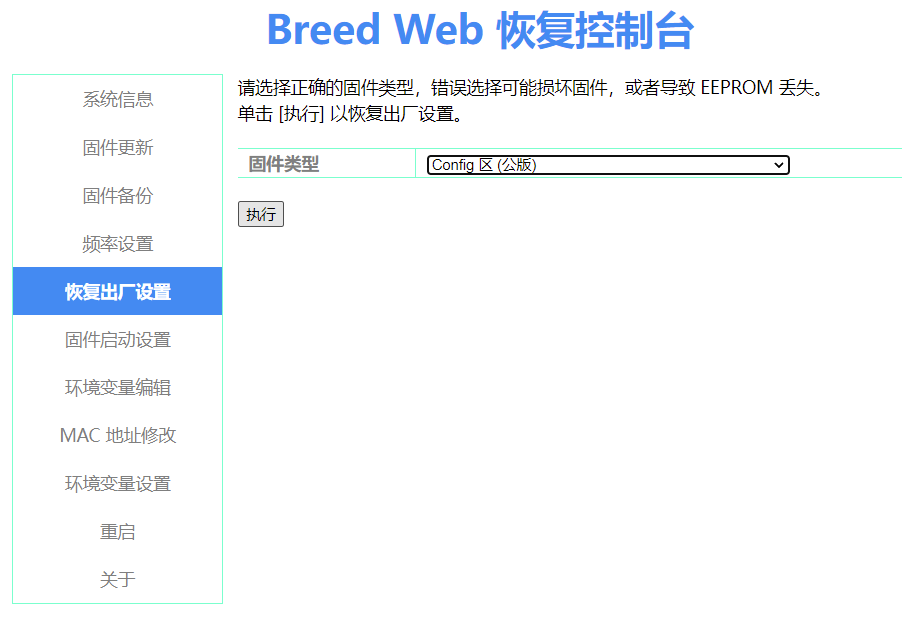
11. you might need to boot into Breed for the second time to reset the default settings for the Padavan firmware. To reset the settings, click the 5th button on the menu, then select Config and click the submit button to reset the settings. It should look like this
